E-mail subscribers: this particular article is probably best viewed online in the blog itself, rather than in the e-mail message, due to all of the videos.
Earthquakes frequently make cabinet doors swing open and knock out everything in the cabinets, creating a massive mess in the best case, and serious damage or injury in the worst case. Consider not only the breakable dishes and glasses in those cabinets, but also all the different kinds of oils and vinegars and liqueurs and condiments and sauces and bottled-that and jars-of-this that could tumble out and smash onto the floor… well, I suppose a revolutionary new culinary combination taste sensation could come out of it (or, if the earthquake is well-timed with an electrical storm, perhaps a new life form), but it’s generally a good situation to avoid. Having quake-resistant cabinet latches, especially in the high cabinets of a kitchen, is a really good idea.
There are several different kinds of products that call themselves quake resistant latches. I’ve long been a big proponent of push latches (touch latches) and have used them for about 25 years now in multiple apartments and condos. These are the latches that prevent your cabinet doors from opening unless the door is pushed in first to make them disengage, and then they re-engage when the door is pushed in again to close. I wrote a long article about tips and tricks for installing these latches in 2012 and for a while, it was the most widely viewed post on this blog. However, the question has been raised occasionally about whether an earthquake could shake the door just right so that it jiggles inward and disengages itself, defeating the whole purpose of having the latch.
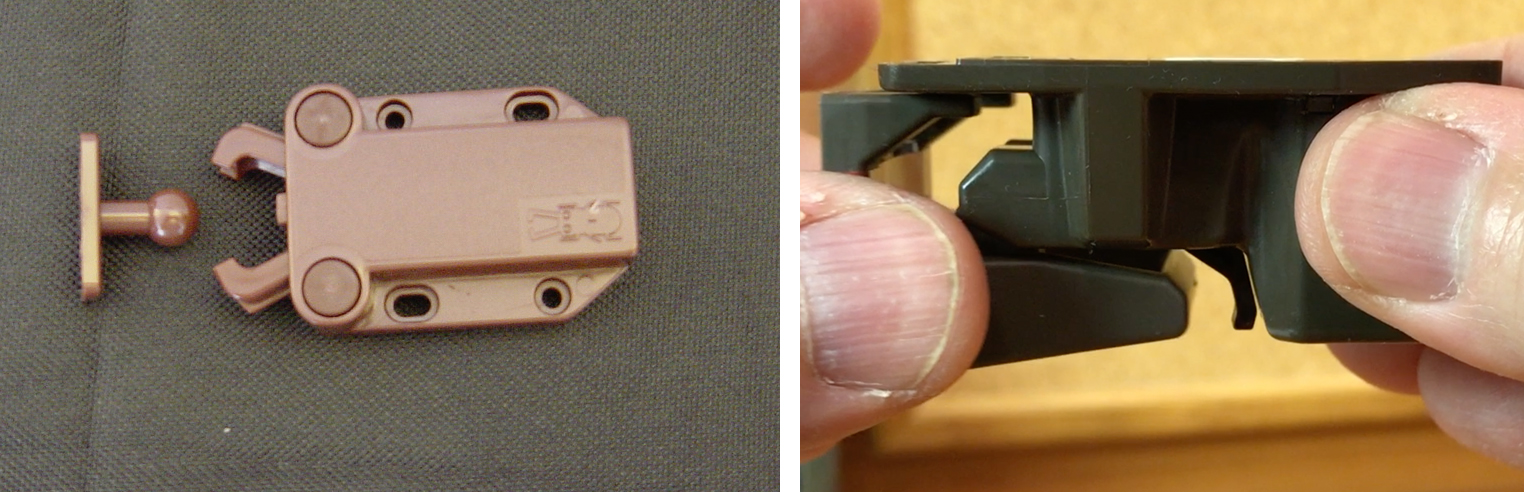 |
| The two latches being compared: push latch (left) and Murakoshi latch (right) |
First, some important disclosures:
- The Illinois company that is exploring marketing and distributing these latches in the US, Tuson Corporation, which also deals in RV braking safety technology as well as manufacturing for various industries, contacted me initially to get my opinion about the potential US market. They supplied me with some complimentary test samples to try out that I was free to keep and use. Other than these test samples, I have not been compensated in any way to evaluate these latches, the company has known from the start that I would write an honest assessment even if negative, and when I decided to get more of their latches, I purchased them at full price.
- Based on my experience with different latches, I volunteered as a favor to review an early draft of their English translation instructions and made suggestions from the standpoint of someone who would try to follow them and install the latches.
- Unlike my decades of experience with push latches, I have only used these Murakoshi latches for a few months and therefore can’t advise from personal experience that they will work in a quake or will not freeze up with normal use. However, I am told by Tuson that these latches have been used in Japan successfully for a couple of decades (I have not attempted to independently verify that claim) and that they are on their third generation of latches.
- Some of my conclusions of how push latches and Murakoshi latches compare are based on seeing videos provided by Murakoshi itself. However, I found the videos to be pretty convincing.
I also want to discourage a subsequent wave of companies asking me to review their products, since I don’t have time to open myself up to that. However, in this case, Murakoshi’s approach was intriguing and I feel that the information I have learned about these latches is well worth passing along.
Comparing the different strategies for quake-resistant latches
I don't like latches that are always closed and you have to push something out of the way every time you open the cabinet, like the typical child-proof cabinet latches; too much interference in everyday use of your kitchen.
I also don't like latches that engage when they sense shaking from a quake, because if some mechanism in the latch has to fall due to the quake, the door could have already opened. I tried the “Shocklock” many years ago and I had to shake it violently for it to finally activate after many seconds. Similar products have been marketed subsequently by some well-regarded seismic bracing companies and I admit I have not tried those latches, but in general, I feel it is a weak concept that success hinges (pun intended) on something in the latch that has to move before the door moves.
I do like the push latches, other than the potential for them opening as described here, as the extra pushing motion is really not inconvenient and is even nice because the door than springs toward you as it opens. One concern is that if your guests try to open your cabinet without realizing it has a push latch, they can potentially damage the latch or themselves!
When Tuson contacted me and described the Murakoshi latch, I was initially prepared to dismiss it as just another motion-activated latch. However, they have a really neat reverse twist on the concept: this latch is always in the position to prevent the door from opening but it moves out of the way when the door opens. However, a little pendulum mechanism inside the latch has to be centered to allow this, and any displacement of the pendulum prevents the latch from moving out of the way when the door opens. Sounds hard to picture but it works quite well (look at the videos a few paragraphs down). This means that nothing has to move into a lock position before the door opens. When the shaking stops and the pendulum rests in the middle again, the latch can open again; unless something has fallen and is pushing the door from the inside, in which case it doesn’t release until you push the door back inward. Ingenious. And it works.
These latches do have a few disadvantages. First, they are expensive. Mine were $12.50 per latch (they are sold in pairs); about double the cost of push latches, which adds up if you are outfitting an entire kitchen. Second, they can only be installed in certain cabinet configurations (more on that later). Third, they are, to put it simply, a pain to install. Even after having installed quite a few of them now, I still find the process to be a mini-ordeal and prefer to not attempt to install more than two of them in one session. However, this article will take a similar approach to my previous article about push latches: tips and tricks for installation and descriptions of how I dealt with some unusual situations.
Do push latches really open up in earthquakes?
 |
| Video (below) showing cabinet doors with push latches not opening in an"armquake" and photos (above) showing the latches in that cabinet; note the "tenting out" of the cabinet doors (click to enlarge image). Oh, did you notice in the video that my plant pot is stuck down?? |
CAN push latches really open up in earthquake?
However, I have now seen videos of earthquake simulation tests (from Murakoshi; see disclosures above) of various latches and I've witnessed with my own eyes the push latch disengaging in some cases, with the Murakoshi latches remaining closed. Take a look at these videos below showing a push latch and Murakoshi latch in the same simulation of the huge 2011 Tohoku earthquake. I have seen several videos of push latches and several of Murakoshi latches, each with simulations of different large Japanese earthquakes from the last few decades, but I’m showing you just one representative of each; the other videos are similar and some smaller quakes also disengaged the push latch. What makes it compelling is that you can watch from outside the cabinet and also from another camera inside the cabinet, showing what the latch is doing. (You can watch small videos below, or better yet, click these links for larger videos of the push latch and Murakoshi latch and watch them on the full screen setting.)
Another caveat here: I can’t discount the possibility that the simulations and latch installations were optimized to encourage push latch failure and Murakoshi latch success. However, I believe that the several push latch videos I saw do indicate that they CAN open, and that Murakoshi latches held under these rather violent circumstances.
One thing that occurred to me while watching these push latch videos is that the chances of these jiggling open are increased if there is relatively little resistance to the “push” motion to open the latch, and relatively short distance to travel from the starting position to the push-in position. As I discussed in my push latches article, cabinet doors that use push latches can’t rest in the most fully closed position because then there would be no more room to push in to open them, so they have to stick out a little, which has aesthetic disadvantages for double-doors because of the “tenting” look. However, in these Murakoshi videos, I see that the push latch cabinet door did not have to move very far to reach the push-in disengagement position. Minimizing the distance with push latches makes them look the most normal so people might intentionally strive for that situation. However, perhaps the best way to install push latches is to have a healthy distance (like in my figure above), therefore having a greater resistance to push in, reducing the chances that parallel jiggling of door and cabinet in a quake could reach the opening position.
So, I think the push latches will prevent the doors from opening in most quakes, especially if you give the door a little extra distance between its resting and opening positions, and I suspect that they will open in some quakes under the right circumstances; but it’s still far better to have push latches than to not have quake resistant latches at all. If I had a kitchen full of push latches, I’m not sure I would actually replace them all with the Murakoshi latches, but I might adjust their positions to make the cabinet doors stick out a little more.
So how about those Murakoshi latches?
However, while I DID have a kitchen full of push latches, Tuson contacted me a few months before I was already planning to move to another home in which the cabinets had no latches at all, so this was a great opportunity to test the new ones and consider installing them instead of push latches. I now have them on most of my upper kitchen cabinets, and what follows is a guide to how I have determined is the best way to install them, including a few extra steps to deal with a non-optimal situation in which the cabinet has a slight step down from its ceiling to the top of the frame (hard to describe; see photographs).
 |
| Murakoshi latch, click to enlarge image |
How do the latches work?
I took the liberty of dissecting one of the latches because I think it’s difficult to believe that the concept works until you see it with your own eyes. The three videos are below and I am also including links to the larger versions online (again, you will have the best results by clicking on the following links and watching the high resolution videos on full screen). In this first video (with audio), I have popped the top off and I’m showing you how the guts work. In the second video (with audio), I’ve re-assembled it and I am demonstrating how the latch works while in my hand, not installed. In the third video (no audio in this one), you can see how the latch works after it’s been installed. Note that the catch on the door is supposed to freely slide up and down to ensure that the latch and the catch will fit together perfectly; the catch gets pushed into the correct vertical position when it first meets the latch.
INSTALLATION
I’m making the installation instructions available here as a pdf, the instruction sheet that came with most of my latches. Haha, guess what, it’s in Japanese! If you end up obtaining these latches from Tuson, you will probably have to specify that you want the English instructions, which came with the first latches they sent me and which are available here. Now, I did review an earlier version of the English instructions to make suggestions, but I have to say, even the current version is a bit difficult to follow because the process is a bit complex, so I’ve laid out a step-by-step procedure here based on photos taken while I installed one of the latches. You’ll probably find yourself removing the contents of the top shelf and then removing the shelf itself, so allow room for the power drill.
IMPORTANT: if you have never done this before, start with double door cabinets because if you screw up one and can’t open it for some reason, you’ll still be able to access the latch from the other open door. This also gives you the opportunity to look at how the latches are closing by sticking your head into the other open door, as in the video above.
 |
| Silicone bumper dots push the cabinet door farther away. Click to enlarge image |
Step 1, test the latch: Take each latch individually and before you install it, temporarily remove the two red protective pieces and confirm by hand that the hook part does not move when you jostle the latch, and that afterward, you can get it to move again by holding it perfectly still against the bottom of a cabinet.
- Yep, I really do recommend this, for EVERY latch, because (especially in a single door cabinet) if you close the door and the latch does not open even when stationary, the cabinet could be stuck in the closed position! Out of the original 6 latches I was sent to test, one of them actually would not reliably let me open it again (in my hand) after jostling; in fact, that’s the one I dissected because I was already attempting to fix it and popped the cover off in the process. In the batch that I purchased afterwards, I’ve installed 9 more latches so far and none of them have exhibited this problem. Murakoshi says this problem should not occur and mine might have been a rare fluke, but knowing that such a defect (or perhaps damage in transit) is possible, play it safe and test the latches first.
 |
| Step 1, testing each latch. Click to enlarge image. |
Step 2 (optional, only necessary if there is a step down from the cabinet ceiling), fill the gap: Determine PRECISELY how thick a flat piece of wood or some other material you need to fill the gap.
- I had a very hard flat foam board that I had cannibalized a couple of years ago from the bottom of some old luggage; I also have some flat lightweight wood planks coincidentally of the same thickness. My step is about 7 mm deep and two of these planks together are almost 7 mm. I found that if I used double stick tape to make a two-layer piece and then put 4 more layers of double stick tape on the top, I could stick the whole thing to the ceiling of the cabinet with that tape and it was perfectly flush with the cabinet frame; the extra layers of double stick tape let me get an exactly flush mount that is necessary to avoid torqueing the latch when the screws are tightened. For these rear holes only, because of the extra material in the step, for Step 6 I used my own 3/4” flat-Phillips-head #6 screws instead of the 0.55” flat-Phillips-head #6 screws supplied with the latches.
 |
| Step 2, filling any step-down |
Step 3, position the latch: Make a mark on the wood where you want the latch to start.
- The instructions specify putting the latch 0.8 inches (2 cm) away from the edge of the frame (single door) or center line (double doors), but I found that putting it 3 cm away instead gave me a little more room that was crucial for my power drill/screwdriver to fit in a single door situation. (The instructions only suggest making a mark for the double door but I like doing it on single doors also so that all of my latches will be in consistent positions; I think they look better that way.)
Step 4, mark position of rear holes: (If you have the ceiling step-down, stick your extra layer to the ceiling of the cabinet with the double stick tape.) Hold the latch with its red plastic jig in place up against the cabinet ceiling (I do NOT expose the little built-in tape piece on top of the latch yet), pushing toward the back of the cabinet until the front tabs of the red plastic jig press against the front of the frame, and use a pencil to trace the oval rear holes on the ceiling or the extra layer, depending on your situation. Remove the latch.
- It’s important to press both red tabs against the frame firmly as you mark the holes so that you don’t end up with a skewed latch.
STEP 4 ALTERNATIVE IF YOU HAVE BUMPER DOTS: Before you hold the latch up to make those marks, put some spare bumper dots of similar thickness to those already on your door right behind the tabs of the red plastic jig and press the tabs against those dots, rather than the bare cabinet frame, as in the figure. This ensures that your latch will be forward enough to clear the real dots and connect with the door catch. I have 4 bumper dots that I just keep putting up and taking off as I install a series of latches.
 |
| Steps 3 and 4, positioning latch. Click to enlarge image. |
Step 5, drill rear holes: Use a sharp pointed tool like an awl to punch a dimple into the very center of each oval. Then drill a pilot hole up into the frame. (The instructions say to tape the latch in place and then drill with the bit going through the oval hole, but I found that very difficult and prone to causing the latch to move and be attached unevenly.) I found it best to use a drill bit that is slightly on the large side for what you might normally use for the #6 screws that they supply or their equivalents, large enough to let the screws be tightened without too much difficulty; i.e., 3/32” rather than the 1/16” suggested by the back of my box of #6 screws. I usually lay some aluminum foil over whatever is below to catch sawdust.
 |
| Step 5, drilling rear holes. Click to enlarge image. |
 |
| Step 6, installation of rear screws. Click to enlarge image. |
- A power screwdriver will make this job MUCH easier, but they tend to be bulky, so invest in an extended Phillips screwdriver attachment so that you aren’t limited to that stumpy short one that probably came with your tool.
 |
| Step 7, positioning the catch. Click to enlarge image. |
- It’s nearly impossible to pull that white backing off; I’ve reported this to Tuson and suggested that Murakoshi include a little overhang; we’ll see.
Step 8, drill and screw in catch: The catch has a thin red tape that prevents the moving part from sliding at this point; leave it on. Punch guide holes exactly in the center of the metal holes where the screws will go and then drill into the door with the catch in place. Screw in the supplied catch screws and then pull the red tape off, enabling the catch to slide up and down.
- This requires some dexterity and the picture makes the danger quite obvious: don’t drill through the door!
 |
| Step 8, positioning the catch. Click image to enlarge. |
 |
| Step 9, installation of front screws. Click to enlarge image. |
- Tighten securely but don’t over-tighten, and make sure you aren’t torqueing the plastic of the latch. Close the door; you may need to slide the catch around to get it to go into its home position rather than banging into the front of the latch, but once it is close enough to that position, it will take the exactly correct position as the door closes. Open and close it a few times to make sure you hear the “thunk” of the latch moving up and down. If you are installing in a double door cabinet, reach in the “other” door to feel the latch as you close the latch’s door and feel the hook moving in and out; and to convince yourself that things are lined up functionally, press on the back piece of the moving hook while that door is closed and make sure you can’t open the door as long as you prevent that piece from moving.
You’re done! If you are used to push latches like I was, you may find it unnerving to not hear the click that accompanies the closing and opening of the doors with those latches; that feedback was constantly in the back of my mind telling me that the latch had engaged and disengaged. The lack of the click required a bit of a leap of faith that this new latch will actually work. However, there is that comforting soft “thunk” sound of the Murakoshi latch moving out of the way when the doors open, so there’s still audible feedback that the latch is behaving as expected; it’s just at a different time. It was disconcerting at first but I got used to it pretty quickly.
Warped doors create a problem
 |
| Warped door increased the distance between the latch and the catch; fixed by extending the catch with an extra wood spacer. Click to enlarge image. |
Thoughts on closing
Haha yes, that pun was intended… These latches need to be under a surface that reaches all the way to the door; they cannot be on top of a surface and they can’t be under a surface that stops prematurely. (By the way, not being on top of a surface means that they don’t take up room on your shelf, which is nice.) That means they can’t be used on most floor level kitchen cabinets because there are usually drawers or some kind of empty space above the lower cabinets; there’s nothing on which to put the latch. Push latches are also not the best in lower cabinets in the kitchen because you’ll constantly be opening them with your knees. For these reasons, I have not put quake resistant latches on lower cabinets, figuring that in most cases, things falling out of a lower cabinet won't cause many problems. I did install a very stiff latch on one lower cabinet in my previous home that had a bunch of stacked serving dishes; figured it was better than nothing. You can always put a catch style latch if you need to, but that looks, well, industrial (see the second-to-last figure in my push latch article). And I guess the point of those move-a-lever child-proof latches are to keep the toddler away from the bleach below your kitchen sink. Still, someone really needs to come up with a good solution for quake resistant lower kitchen cabinet doors. [Revised 10/8/18 - Hey, someone did! Tuson points out that a 90 degree bracket can be fastened inside the frame and the latch can be attached to the bottom of the bracket, as shown in this extra photo added in this revision. Hopefully they will come out with an official attachment for this purpose, but if you really want to, you can rig up something yourself. The same could be done for push latches, although then the door would be at the mercy of knees and dogs.]

Updated 7/8/19; 6/8/26: Tuson now offers these latches through their own online store. If you have questions, you can contact Tuson directly at inforvbrakes@tuson.com. Again, Quaketips has not gone commercial and it’s unusual for me to provide direct marketing information in this blog, but I think it is appropriate in this case to let you know where to find them. I have no financial connections with Tuson, Murakoshi, or any other latch manufacturer/marketer for that matter. And I repeat, while I’m impressed with the latches and have installed them in my own kitchen, I do NOT have enough experience with these latches (and won’t for many years) to feel comfortable “endorsing” or “recommending” them over other types. So let’s just say I’ve started a long-term experiment; the next time there’s a big quake, please fill up the comments section for this article saying what kind of latch you have (or no latch at all) and whether your doors opened! (I hope I am not unlatching Pandora’s box…)
>>back to blog
Interesting concept. Can't seem to find these for sale, however, can you help? Thanks.
ReplyDeleteRight, they aren't easily findable in the US market yet, as mentioned at the end of the article. There's some info there about a contact person for Tuson that I provided, not as an advertisement, but just because I wouldn't want to tell people all about something they can't actually get. I advise contacting her directly, and hopefully they get these on Amazon or some other system easily accessible to the global market.
DeleteYou can get these on Rakuten Global Market (Amazon for the rest of the world). Approximately $4 each. Beware the Japanese-to-English translation. I believe "toy" must mean "plastic." This is the current link to the item in the store "Interieur Deco."
Deletehttps://global.rakuten.com/en/store/interieur-deco/item/j3-pfr-t/
Thanks very much for this comment. Rakuten is where I got the Japanese expanding posts that I used to brace the top of the huge wardrobe in my subsequent article at http://quaketips.blogspot.com/2018/12/how-i-braced-monster-wardrobe-and.html and I was not aware that they carried the Murakoshi latch.
DeleteTwo caveats: First, when I tried clicking on that link, my attempt to connect to the website was blocked by my ISP and I got a page saying that it was a malicious website that might be masquerading as another one. However, I went to Rakuten directly and found my way to the listing for this latch, and the link for it is exactly the same link that you provided, so it's probably fine but be careful out there... Second, from the picture shown, this latch appears to be the predecessor to the current "PFR-TSAα" (that's a Greek letter alpha) that I have. The two main differences that I can see are that the holes to attach the latch part to the cabinet frame are further back in what is probably not as strong of a position, and more importantly, the catch part seems to be one piece of solid plastic rather than the current design in which the catch slides up and down in its bracket. That last detail is important because it means you don't have to perfectly position the two pieces; the catch will move a little to slide into its position.
So keeping all that in mind, I suppose it is better than not having it but you may run into additional problems with this that have been solved in the current version.
Hi Everyone, this is Felice One from Tuson Corporation. We are the only US distributor for the Murakoshi Earthquake-proof latches. If you purchase it from third party sources, you will not have customer service of warranty support as they are not official distributor for Murakoshi. You can now purchase them directly from our online store only: https://tusonrvbrakes.com/collections/murakoshi-earthquake-proof-latch-series-pfr-tsa
DeleteThe main difference from the PFR-TSA vs the PFR-TSAα is that the PFR-TSAα is the aftermarket DIY version which makes installation much easier. The PFR-TSAα has the intergrated jig, double-sided tape, and mounting screws all provided in the kit. The PFR-TSA is for professionals only and everything is sold separately and usually in large quantities. If you are a professional builder and are interested in the PFR-TSA pricing, please email me at felice-one@tuson.com
Thanks Felice!
DeleteI am wondering if the Murakoshi (or any) Earthquake-proof latches can be installed on the bottom of the cabinet, rather than the top.
ReplyDeleteThe Murakoshi latch can't be on a bottom shelf because of the way its mechanism works, with attachment points at the top of the latch and the movable piece at the bottom. They could be under a lower shelf with space underneath, but can't be mounted on the cabinet floor. In contrast, the touch latches can be installed on the cabinet floor; that's actually how I usually have done it (you can see photos of that if you follow the link to the push latches article in the main text above).
DeleteHave you checked out the Epco or Sugatsune style mini push latch that is less than $2? Would value your impression.
ReplyDeleteSorry for the delayed reply. Most of the comments I receive on this blog are spam (which never make it past my moderation); posting from a name like "Mr. Project Hacker" makes it look like obvious spam at first glance! The Sugatsune style is like the original touch latch referenced in this article, being compared to the Murakoshi latch, so info about that latch is above. I know there are some flatter ones of the same style and I have not played around with those; and regarding price, it's fluctuated wildly over the past couple of decade. Regarding the Epco, I actually had not seen that before so I don't have any direct experience, but now I'm curious and will get one to check it out. Any impressions may take a while to get onto the blog but I can at least update replies to this comment when I have more info.
DeleteI just received my Epco latch in the mail and I'm pretty impressed; it's a touch latch that works by a different mechanism than the ones I've always used (claw and peg Sugatsune style). It may be less stable than the Sugatsune ones for a couple of reasons: first, the pieces have fewer screw holes and/or spacing between holes than the Sugatsune style so they may not hold quite as well, and second, the Epco's moving latch part moves in and out of the catch part from one direction whereas the claw catches the peg from both sides in the other one. But as long as it is installed correctly, it seems to me like it would do a good job of holding the door shut. The theoretical possibility of the other touch latch activating during a quake if the door moves in and out would also apply to this one.
DeleteHi, do you have any info or links to specific 90 degree brackets that will fit the latch? I asked the Tuson and they had no info for me.
ReplyDeleteI haven't actually tried this yet, although I already purchased the latches to do it. Finding the right kind of bracket and deciding how to attach the latch are the main factors in that procrastination; but also the items in my lower cabinets won't cause that much trouble if the doors swing open. If you do try it and find an appropriate bracket, please let us know in another comment!
DeleteI've had no luck finding a bracket to fit the measurements I need, so I'm just going to cut some wooden shims/spacers instead.
DeleteSounds like a great idea. I'll bet an appropriately sized block would do the trick.
ReplyDeleteDoes anyone know why there is a max 35 inch hight limit for this latch to work on cabinets?
ReplyDeleteThanks for the comment; that's a good question. I haven't thought about that in a while, although when I was installing these on a very tall (~10 feet) cabinet, I didn't feel confident that a single latch on the top would hold the entire door if things were trying to push their way out closer to the bottom. I addressed that issue by installing two latches in one single-door cabinet (one at the top and one under a lower shelf) to work in tandem; and for the other part that is a two-door cabinet, I installed latches at the top but also keep a clasp around the external handles that stops the doors from swinging open; I figure between the two, I should be ok. You can pictures of these solutions at my other article at https://quaketips.blogspot.com/2018/12/how-i-braced-monster-wardrobe-and.html
DeleteMakes sense, thank you. My cabinets are 40 and 45 inch high, so I am debating if I need a second one. Do you have any concern for the middle rack not staying place during an earthquake?
ReplyDeleteI have pins above and below each rack, but the top pins are not designed for an earthquake, just for small bumps.
Right, if the middle rack isn't fixed and can easily slide out, it might be dragged out by an opening door. I admit I have not figured out how the radial opening motion influences that, but I try to have pegs that don't just stick into the cabinet but also stick into the shelf, so they can't slide. One more consideration is whether the pegs can break; in fact, check out https://quaketips.blogspot.com/2017/03/do-you-have-ticking-time-bomb-in-your.html . This was not written with cabinet latches in mind so it involved replacing plastic supports with metal paddles, but nowadays, I like to get metal supports with the pegs that stick into holes in the bottom of the shelf.
DeleteIf contents spill against the door won’t contents fall out after shacking and lock goes back to neutral position?
ReplyDeleteExcellent question. The latch stays unable to open until it's returned to its home position. This means that as long as items are leaning against the door after the shaking ends, it will stay closed. However, that means that you'll need to push the door in to get the latch to unlatch, and you'll need to be careful to stop anything from falling out afterwards.
DeleteMatt,
ReplyDeleteI have seen these latches in cabinets in Japan. And I always wondered how they worked. Thank you for your videos!
I am building my kitchen in the SF area, and I wanted to use murakoshi latches. My main concern is what happens if the fail in the locked position. Other than forcing the doors open (breaking the plastic latching bar) there doesn't seem to be a way to open the door.
Do you still like the latches after 7 or so years?
MO
Hi Max, thanks for the comment. The thought of a latch getting stuck in a closed position has occured to me, but I havent' experienced it; of course, I also haven't been through a major earthquake with them. The closest it has come to that is atht of the many latches that I installed in our kitchen, one (only one) tends to catch when opening the door and blocking it from opening, and right after that, it's all working again.
DeleteI do like the latches. Unlike the push latches that I used for years, there's no extra routine to opening and closing doors. They are a pain to install; that's for sure, but I think it is worth it.
Sorry if this reply gets posted twice, i just tried posting it, and it disappeared.
DeleteThe thought of the latches getting stuck in the closed position has occurred to me, but I haven't experienced it. Of course, I also have not been through a major earthquake with these latches. The closest it has come to that is that of all the latches that I installed in my kitchen, one (only one) occasionally catches as I try to open the door and there's a momenty refusal to open, which resolves immediately after that.
I do like the latches. Unlike the push latches that I used for years, there's no extra routine to opening and closing the cabinet doors. They are a pain to install, but it's worth it in my opinion.